Basic Texturing with Metal
Handling Window Resizing
Before we jump into the fun of adding textures, there's one thing I'd like to add, and that is window resizing. Currently when we resize the window, the resolution of our metalLayer.drawableSize will not be updated. To handle this, we'll first define two new functions in our MTLEngine class:
class MTLEngine {
...
    static void frameBufferSizeCallback(GLFWwindow *window, int width, int height);
    void resizeFrameBuffer(int width, int height);
...
};
void MTLEngine::frameBufferSizeCallback(GLFWwindow *window, int width, int height) {
    MTLEngine* engine = (MTLEngine*)glfwGetWindowUserPointer(window);
    engine->resizeFrameBuffer(width, height);
}

void MTLEngine::resizeFrameBuffer(int width, int height) {
    metalLayer.drawableSize = CGSizeMake(width, height);
}

void MTLEngine::initWindow() {
    ...
    glfwSetWindowUserPointer(glfwWindow, this);
    glfwSetFramebufferSizeCallback(glfwWindow, frameBufferSizeCallback);
    ...
}
GLFWwindow*, width, and height automatically for us. One issue is that if the callback function is created as a member function in a class, it's required to be static. Normally, this would be an issue, as we want to update the drawableSize property of our metalLayer variable, which is non-static. We can solve this problem by using the glfwSetWindowUserPointer() and glfwGetWindowUserPointer() functions provided by GLFW. We can store a pointer to our MTLEngine instance in the GLFW window, then retrieve it in the static callback function to access our non-static resizeFramebuffer() function, where we actually resize the metalLayer.drawableSize.
Now when we resize our window, it will resize the metalLayer accordingly!
Applying Textures to our Meshes
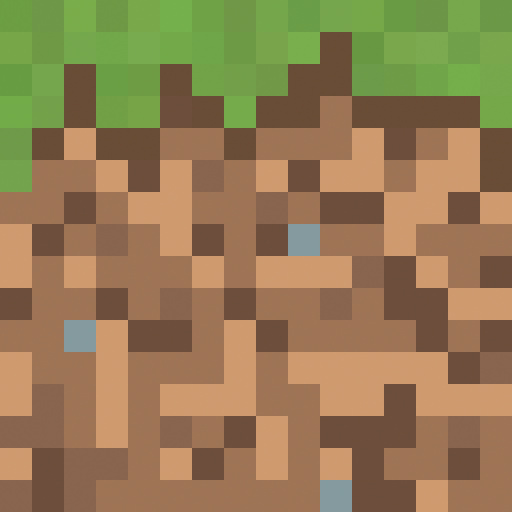
In order to apply a texture to our mesh, we're going to to need a texture image. You can choose any image you like, but I'll be going with this one. Feel free to use it as well. Once you have your image, create an assets folder in your Xcode project and place your image inside it. Now that we have a texture, we'll need a way to load it in to memory. For this we'll use stbi_image, which is a lightweight header-only image loading library. In the external directory, create a new folder called stb, and right click this link and save the header file there. Next, create an implementation file called stbi_image.cpp in the same folder and add this code:
stbi_image.cpp implementation. Go to your Project Settings -> Build Phases -> Compile Sources and add stbi_image.cpp.
To load our texture, we'll create a new Texture() class. Create two new files in the source directory: Texture.hpp and Texture.cpp.
#pragma once
#include <Metal/Metal.hpp>
#include <stb/stb_image.h>
class Texture {
public:
    Texture(const char* filepath, MTL::Device* metalDevice);
    ~Texture();
    MTL::Texture* texture;
    int width, height, channels;

private:
    MTL::Device* device;
};
MTL::Texture. We'll also define three public variables width, height, and channels to store the dimensions and number of color channels contained in our loaded image, as well as a handle to our Metal Device.
#include "Texture.hpp"

Texture::Texture(const char* filepath, MTL::Device* metalDevice) {
    device = metalDevice;

    stbi_set_flip_vertically_on_load(true);
    unsigned char* image = stbi_load(filepath, &width, &height, &channels, STBI_rgb_alpha);
    assert(image != NULL);

    MTL::TextureDescriptor* textureDescriptor = MTL::TextureDescriptor::alloc()->init();
    textureDescriptor->setPixelFormat(MTL::PixelFormatRGBA8Unorm);
    textureDescriptor->setWidth(width);
    textureDescriptor->setHeight(height);

    texture = device->newTexture(textureDescriptor);

    MTL::Region region = MTL::Region(0, 0, 0, width, height, 1);
    NS::UInteger bytesPerRow = 4 * width;

    texture->replaceRegion(region, 0, image, bytesPerRow);

    textureDescriptor->release();
    stbi_image_free(image);
}

Texture::~Texture() {
    texture->release();
}
Texture() constructor, we first set our Metal Device handle, and then we tell stbi to flip our image vertically on load, as Metal expects the 0 coordinate on the y-axis to be on the bottom side of our image, rather than at the top.
We then load our image, make sure the pointer isn't null, and then we create our MTL::TextureDescriptor, specifying the Pixel Format of the image, as well as the width and height. We then ask our device to create the texture for us with the specified parameters, and we then copy the image data into the texture buffer. Finally, we release the textureDescriptor, and free our image buffer. We now have a texture loaded into GPU memory! Hooray. Oh, and don't forget to create your destructor and release the texture on destruction.
Now, we'll go back to our mtl_engine.hpp and make a few changes:
...
#include "VertexData.hpp"
#include "Texture.hpp"
#include <stb/stb_image.h>
...
#include <filesystem>

class MTLEngine {
public:
    void init();
    void run();
    void cleanup();

private:
    void initDevice();
    void initWindow();

    void createSquare();
    void createDefaultLibrary();
    void createCommandQueue();
    void createRenderPipeline();

    void encodeRenderCommand(MTL::RenderCommandEncoder* renderEncoder);
    void sendRenderCommand();
    void draw();

    static void frameBufferSizeCallback(GLFWwindow *window, int width, int height);
    void resizeFrameBuffer(int width, int height);

    MTL::Device* metalDevice;
    GLFWwindow* glfwWindow;
    NSWindow* metalWindow;
    CAMetalLayer* metalLayer;
    CA::MetalDrawable* metalDrawable;

    MTL::Library* metalDefaultLibrary;
    MTL::CommandQueue* metalCommandQueue;
    MTL::CommandBuffer* metalCommandBuffer;
    MTL::RenderPipelineState* metalRenderPSO;
    MTL::Buffer* squareVertexBuffer;

    Texture* grassTexture;
};
VertexData.hpp yet, we'll get to that in a moment. We're no longer going to be rendering a triangle. Instead, we'll render a square, so change createTriangle() to createSquare(), and triangleVertexBuffer to squareVertexBuffer. Lastly, let's add our grassTexture member variable.
As we're going to be rendering a texture, we're going to need to pass the GPU some extra information about how we'd like to map the texture to our square. We call this information "uv" or "texture coordinates". In this case, it will be very easy to create a mapping, as the four corners of our square will correspond directly to the four corners of our texture in uv coordinates. UV coordinates range from 0.0 to 1.0, with (0,0) corresponding to the bottom left-most corner of the texture image, and (1,1) corresponding to the top right-most corner.
#pragma once
#include <simd/simd.h>

using namespace simd;

struct VertexData {
    float4 position;
    float2 textureCoordinate;
};
VertexData.hpp and define a struct correspondingly named VertexData. You'll notice the inclusion of the <simd/simd.h> header file, which is an Apple library that contains math data-types that correspond directly with our Metal Shader datatypes, such as float4 vectors, float4x4 matrices, etc. We'll use this library to define our vertices as a simd::float4, and our texture coordinates as simd::float2. I've thrown in a using namespace simd for convenience.
Now, we can hop back over to mtl_engine.cpp and define our square:
void MTLEngine::createSquare() {
    VertexData squareVertices[] {
        {{-0.5, -0.5,  0.5, 1.0f}, {0.0f, 0.0f}},
        {{-0.5,  0.5,  0.5, 1.0f}, {0.0f, 1.0f}},
        {{ 0.5,  0.5,  0.5, 1.0f}, {1.0f, 1.0f}},
        {{-0.5, -0.5,  0.5, 1.0f}, {0.0f, 0.0f}},
        {{ 0.5,  0.5,  0.5, 1.0f}, {1.0f, 1.0f}},
        {{ 0.5, -0.5,  0.5, 1.0f}, {1.0f, 0.0f}}
    };

    squareVertexBuffer = metalDevice->newBuffer(&squareVertices, sizeof(squareVertices), MTL::ResourceStorageModeShared);

    grassTexture = new Texture("assets/mc_grass.jpeg", metalDevice);
}
squareVertexBuffer. Lastly, we'll create our grassTexture texture object. An important thing to note, is that if we want to specify a relative path to load the image like I've done here, we'll need to change our Xcode working directory to the project directory. We can do that by going to Product -> Scheme -> Edit Scheme, or by hitting ⌘+<. Then go to Run -> Options and click "Use custom working directory:" and specify $(PROJECT_DIR) as the directory. This should allow you to specify the correct path. Alternatively, you can specify the full-path to texture to load it if you like.
void MTLEngine::encodeRenderCommand(MTL::RenderCommandEncoder* renderCommandEncoder) {
    renderCommandEncoder->setRenderPipelineState(metalRenderPSO);
    renderCommandEncoder->setVertexBuffer(squareVertexBuffer, 0, 0);
    MTL::PrimitiveType typeTriangle = MTL::PrimitiveTypeTriangle;
    NS::UInteger vertexStart = 0;
    NS::UInteger vertexCount = 6;
    renderCommandEncoder->setFragmentTexture(grassTexture->texture, 0);
    renderCommandEncoder->drawPrimitives(typeTriangle, vertexStart, vertexCount);
}
renderCommandEncoder to specify the buffer to load in our Vertex Shader for our square, and set the texture for use in our Fragment Shader.
Finally, let's modify our Shader Code to be able to handle our Vertex Data and sample our texture.
#include <metal_stdlib>
using namespace metal;

#include "VertexData.hpp"

struct VertexOut {
    // The [[position]] attribute of this member indicates that this value
    // is the clip space position of the vertex when this structure is
    // returned from the vertex function.
    float4 position [[position]];

    // Since this member does not have a special attribute, the rasterizer
    // interpolates its value with the values of the other triangle vertices
    // and then passes the interpolated value to the fragment shader for each
    // fragment in the triangle.
    float2 textureCoordinate;
};

vertex VertexOut vertexShader(uint vertexID [[vertex_id]],
             constant VertexData* vertexData) {
    VertexOut out;
    out.position = vertexData[vertexID].position;
    out.textureCoordinate = vertexData[vertexID].textureCoordinate;
    return out;
}

fragment float4 fragmentShader(VertexOut in [[stage_in]],
                               texture2d<float> colorTexture [[texture(0)]]) {
    constexpr sampler textureSampler (mag_filter::linear,
                                      min_filter::linear);
    // Sample the texture to obtain a color
    const float4 colorSample = colorTexture.sample(textureSampler, in.textureCoordinate);
    return colorSample;
}
VertexData struct in our Shader code as well by including VertexData.hpp.
As for our Vertex and Fragment shader functions, we'll need to rewrite them. I've defined a new struct VertexOut, which will hold our output data from the Vertex Shader. We need to declare the [[position]] attribute on our position member to indicate to Metal that it should apply perspective-division to it. Typically, our vertex-coordinate would be in clip-space by the end of our vertex function, but we have not yet applied perspective to our square. We will cover this in great detail in Lesson 2 when we go 3D, so for now just know that Metal requires that we specify this attribute. Our second member, textureCoordinate doesn't require a special attribute. Our texture coordinates at each fragment in our square will be interpolated automatically by the rasterizer.
Our new input into our vertexShader() function is of course our vertexData. This remains in the constant address space, which refers to buffers allocated in the read-only device memory pool. If you'd like to learn more about address spaces in Metal before I specifically cover them, please refer to section 4.0 of the Metal Shading Language Specification.
As input to our fragmentShader() we'll pass in our VertexOut information, as we'll want the interpolated texture-coordinate information when sampling our texture. The [[stage_in]] attribute qualifier indicates that the in parameter is an input from the previous pipeline stage. Additionally, we'll also take in our texture as a texture2d<float>, specifying with the attribute [[texture(0)]] that we'll want the texture at index 0. Given that we only have one texture to sample from, we don't technically have to specify the texture slot, but it's a good practice to maintain. We first create a sampler object, specifying linear filtering for magnification and minification.
- Magnification: This occurs when a texture is displayed at a larger size on the screen than its original size (i.e., the texels cover more than one screen pixel). In this case, the shader needs to interpolate the color values between the texels to create a smooth transition between them and avoid a blocky appearance.
- Minification: This occurs when a texture is displayed at a smaller size on the screen than its original size (i.e., multiple texels are mapped to a single screen pixel). In this case, the shader needs to determine the best color value to represent the group of texels that are being combined into a single screen pixel.
In the texture sampler, we specify linear for both mag_filter (magnification filter) and min_filter (minification filter), which means we want to use linear interpolation for both magnification and minification operations. Linear interpolation provides smoother and more natural transitions between the texels compared to nearest-neighbor filtering (which would result in a blocky or pixelated appearance). However, linear filtering may also introduce some blurriness, especially during minification.
Finally, we sample and return the color from our texture, using our textureSampler and interpolated texture coordinate in.textureCoordinate.
Before we'll be able to see our beautiful textured square, we'll have to make a couple of last changes in mtl_engine.cpp:
void MTLEngine::encodeRenderCommand(MTL::RenderCommandEncoder* renderCommandEncoder) {
    renderCommandEncoder->setRenderPipelineState(metalRenderPSO);
    renderCommandEncoder->setVertexBuffer(squareVertexBuffer, 0, 0);
    MTL::PrimitiveType typeTriangle = MTL::PrimitiveTypeTriangle;
    NS::UInteger vertexStart = 0;
    NS::UInteger vertexCount = 6;
    renderCommandEncoder->setFragmentTexture(grassTexture->texture, 0);
    renderCommandEncoder->drawPrimitives(typeTriangle, vertexStart, vertexCount);
}
squareVertexBuffer, update our vertex count to 6, and set our grassTexture at texture index 0 in our fragment shader. With this we can compile and run!
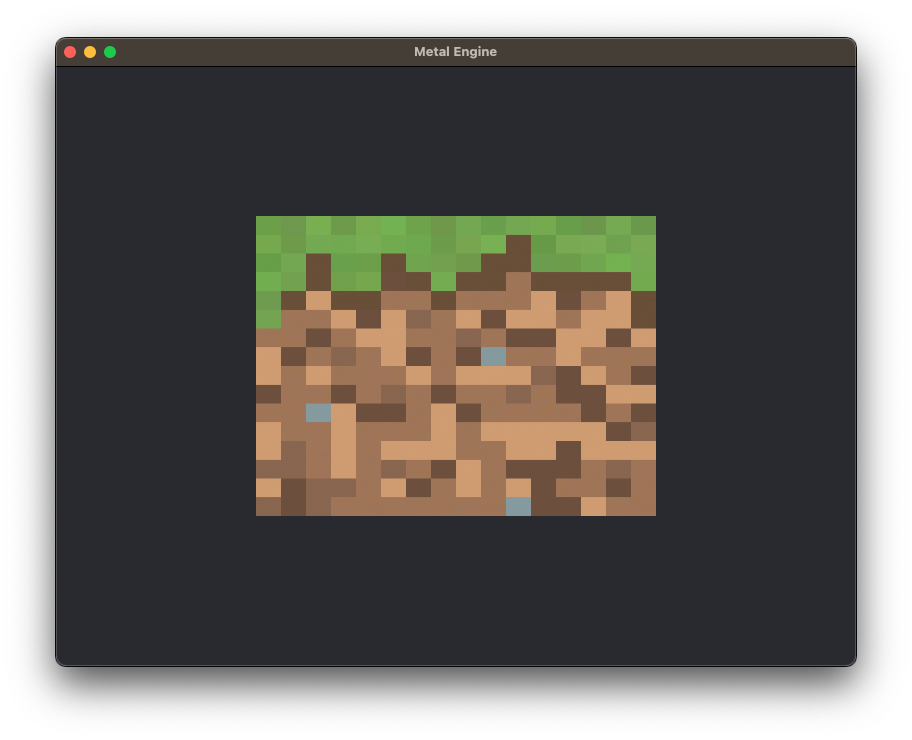
Yes yes, it does look like more of a rectangle than a square, but that's because our window is 800x600. You can change it to 800x800 to make it square. We'll fix these scaling issues when we go 3D in Lesson 2.
If you're stuck, you can download the source code for this chapter here.